Dry pork skin, hard salt, and the heat at the right end of the cook. The method we use on a 60kg hog, scaled down to the joint in your oven.
Crackling fails for one reason. Water.
Pork skin that still holds moisture steams before it can crisp, and once it has steamed you are cooking leather. Every step below is about getting the water out of the skin first and putting the heat in last. Get that order right and crispy pork crackling is not luck. Get it wrong and no amount of oven time will save it.
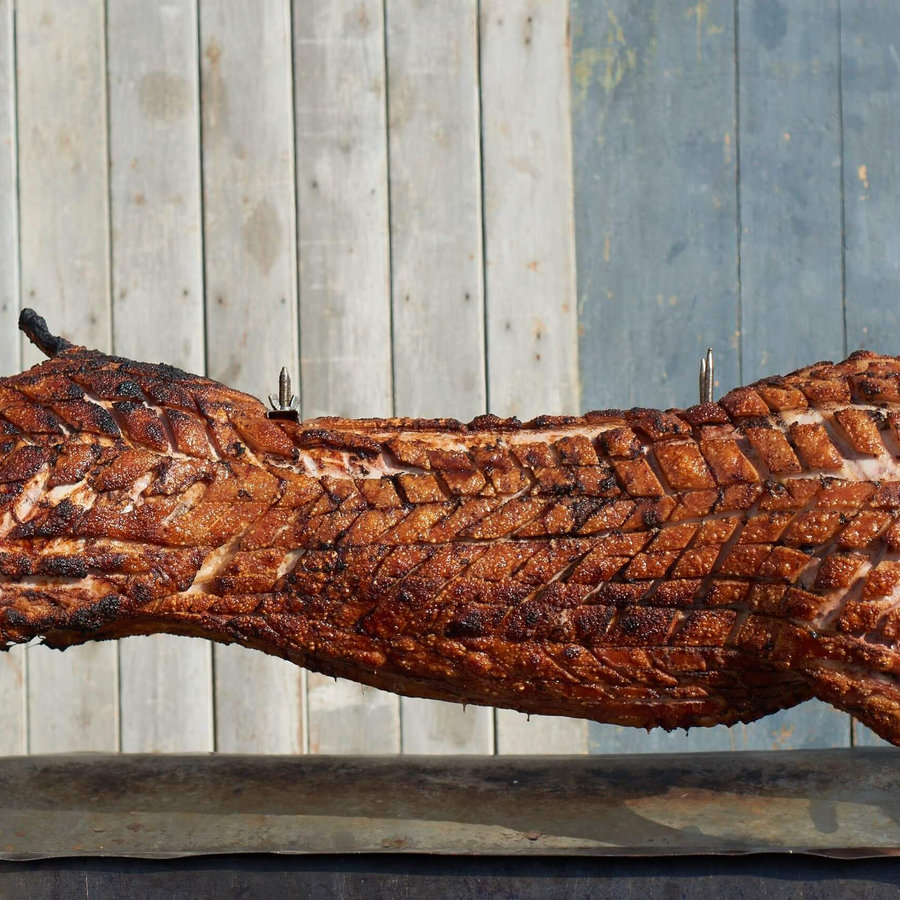
We cook whole pigs over fire for a living. At a wedding this August, ninety-five guests, the hog went on the fire at eight in the morning and came through the marquee whole at five to four. The crackling had come off it twenty minutes earlier and was sitting in its own tray on the pass, because crackling that stays on the animal through service does not survive service. More on that below. The point is that the rules are the same on a 2kg pork shoulder in a domestic oven. The scale changes. The physics does not.
Any cut with the skin still on will give you pork crackling. Three are worth knowing about.
Pork belly has the thickest, most even layer of fat under the skin, which is why belly crackling is the reliable one. The fat renders up into the skin as it cooks and keeps the meat forgiving under a long cook. If you have never made crackling before, start with belly.
Pork shoulder, bone in or boneless, is what most people mean by a Sunday pork roast. The skin is a little tougher and the joint is an awkward shape, so levelling it matters (see the heat section). The meat takes a long, slow cook well and stays moist. Boneless pork shoulder rolled and tied gives you a flat top, which helps.
Pork loin is leaner. The crackling is fine, the meat is less forgiving, and the window between cooked and dry is narrower. Worth it for the crackling if you watch the meat with a probe.
Whatever the cut, ask the butcher to leave the skin on and not to score it. Supermarket scoring is nearly always too shallow to matter and you will be doing it again yourself anyway. One more thing: skin that has been sitting under plastic film for days holds moisture against itself. Buy it the day before and start the drying the moment it comes home.
Take the joint out of the packaging. Pat the skin down with kitchen paper until the paper comes away dry. Then put it uncovered on a rack in the fridge, skin side up, for 24 hours. Overnight will do. A full day is better.
A fridge is a dehumidifier with a light in it. That is the whole trick, and it is free. Every other method on this page is a way of finishing what the fridge started.
If you are short of time, a hairdryer on cold, held 30cm off the skin for five minutes, gets you most of the way there. It looks ridiculous and it works.
Score lines about 1cm apart, straight across the joint. Cut through the skin and about halfway into the fat underneath, and then stop.
Cut into the meat and you have opened a channel for juice to come up through the skin while it cooks. That puts water back exactly where you have spent a day removing it. It is the most common mistake we see, and it undoes everything else.
Use a clean scalpel or a new Stanley blade rather than a kitchen knife. A chef’s knife drags the skin and tears it, and the tearing is what gives you those ragged bald patches. On a whole hog we score with a scalpel and it takes about 25 minutes. On a joint it is two.
On a joint, straight lines are all you need. The herringbone you can see on the hog in the photograph is how we score a whole animal, where sixty kilos of skin has to lift evenly across the ribs. On a 2kg joint it is more cuts than you need, and every extra cut is another place for juice to come through.
Fine salt, worked into the scores with your fingers. Leave it 30 to 40 minutes.
Come back and you will see beads of moisture sitting on the surface of the skin. That is the salt pulling out the last of the water. Wipe every bead off with kitchen paper and re-salt lightly.
This is the step nearly everyone skips, and it is the difference between good crackling and the crackling people talk about afterwards. Leave those beads on and put the joint in the oven, and you have re-wetted the skin at the exact moment you needed it bone dry.
You will read a lot about salt and oil. Oil does very little. It helps the salt cling and it browns the surface a shade earlier, but dry skin and salt are doing the work. If you like to rub oil in, do it after the wipe, lightly, and no sooner.
In a domestic oven: 240°C for the first 25 minutes, then straight down to 160°C for the rest of the cook. The initial blast blisters the skin. The long low stretch cooks the meat without drying it out.
A 2kg shoulder or belly wants around two and a half hours in total. A loin will be quicker. Cook the meat by temperature rather than by the clock: a probe in the thickest part should read 70°C and hold there for two minutes. The crackling is done when it looks done, and the two do not always coincide. If the meat is there and the skin is not, cut the crackling off and finish it on its own (there is a section on that below).
Level the joint so the skin sits flat. Heat will not blister a surface it hits at an angle, which is why one end comes out perfect and the other stays pale and chewy. Scrunched foil balls under the low side, or a couple of onion halves, and the whole sheet crackles evenly. This one adjustment fixes more uneven crackling than any other.
Fan ovens run hotter and drier at the surface, which helps. If yours is a fan oven, 220°C for the blast is enough.
On a hog the order is reversed, and the reason is worth knowing because it tells you what the heat is actually for.
The pig goes on over a low, wide bed of embers first thing in the morning, skin turned away from direct flame, and stays there for six hours or so. The fat renders slowly and the meat cooks through. Then, in the last 25 minutes, we rake the fire right up under the skin and stand there and watch it. The skin lifts and pops across the whole animal at once. It is the noisiest and least relaxing part of the day, and it is the part the food is judged on.
The oven blast at the start of a joint and the raked fire at the end of a hog are doing the same job: a short period of hard, direct heat on skin that is already dry. When you put it in the cook is a matter of what you are cooking. Which is why the joint method works, and why the “low and slow all the way through” method you will see on some barbecue forums produces a soft, rubbery skin. It never gets its blast.
Rest the meat. Never under foil.
Foil traps steam, and steam softens crackling in about four minutes. If the meat needs to rest and the crackling is ready, take the crackling off, break it into pieces, and hold it on a wire rack somewhere warm and open. Rest the meat on its own.
At an event the crackling comes off the animal before anything goes out. It lives in its own tray, on a rack, on the pass, and it is served as its own thing. Carve a hog with the crackling still on it and by the time the queue reaches the back of the marquee it has gone soft under the juices. The same thing happens on a smaller scale if you carve a joint with the crackling attached and leave it sitting on the board.
Three failures cover nearly every disappointing pork roast.
The skin was still wet when the heat went in. Either the drying was too short, the beads were not wiped after salting, or the joint was wrapped or covered at some point. The fix is the same in every case: cut the skin off the joint in one sheet, put it on a tray on its own, and back into the oven at 240°C for 8 to 12 minutes, or under a grill if you are prepared to stand there and not move.
Off the meat it has nothing steaming it from below, and skin that refused to crackle for two hours will often go in ten minutes. Watch it. It turns from pale to perfect to burnt faster than seems reasonable.
The joint was not level, so the heat hit one end square and the other at an angle. Foil balls or onion halves under the low side before the cook. If you only notice at the end, cut the pale section off and finish it on its own as above.
Too much heat for too long, usually a joint left at 240°C for the whole cook, or belly with a thin fat layer. Drop to 160°C after the blast. Choose belly or shoulder with a proper fat layer under the skin. Hard crackling is also what you get from skin that was scored too deep, because the fat that should have rendered into the skin ran out through the cuts instead.
Keep leftover crackling separate from the meat, in an airtight container, in the fridge, and eat it within two days. Left in with the meat it soaks up the juices and goes soft overnight.
To bring it back, spread it on a tray in a hot oven, 200°C, for four or five minutes, or a couple of minutes in an air fryer. It will crisp up again as it cools. A microwave will heat it through and leave it chewy, so if that is all you have, eat it cold. Cold crackling is not a compromise. It is what the kitchen eats at the end of the night.
Yes, and it is the answer to the question we get asked most at the buffet, which is whether there is any more.
Ask a butcher for a sheet of pork skin, sometimes sold as pork rind, with a thin layer of fat still on. Dry it, score it, salt it, wait and wipe, exactly as above. Then onto a rack over a tray at 240°C for 20 to 30 minutes, until it has blistered right across. It will curl. Weigh the corners down with a second rack if that bothers you.
This is also the best way to get crackling for a crowd, because you are not limited by the surface area of one joint.
It does, but only if you then dry the skin again completely.
Boiling water opens the scores and starts rendering the surface fat, which is useful. It also puts water on skin you are about to spend a day drying. So if you are going to do it, do it before the fridge stage: pour, pat dry hard, then leave it uncovered overnight. Do it an hour before cooking and you have made things worse.
At a hog roast the crackling goes out on its own with apple sauce, and people eat it standing up before they have found a plate. At home the same rule holds: serve it in pieces on the side, not on top of the meat, and give it something sharp. Apple sauce, or a wedge of lemon on the plate, cuts the fat.
For the rest of the plate, roast potatoes done in the fat from the tray, greens, and a gravy made from the pan juices. If you want to feed a lot of people from one pig, the sides we put out with a hog roast are on a separate page.
Dry skin, a full day in the fridge uncovered. Score to the fat, not the meat. Salt, wait, wipe, re-salt. Heat hard at one end of the cook only. Never rest it under foil. And if it has not crackled, take it off the joint and give it ten minutes on its own.
Nobody gets all of that right the first time. The one that catches everybody is the wipe, and it is the difference between crackling and perfect pork crackling.
If you would rather someone else stood over the fire for seven hours, that is what we do. Have a look at how our hog and spit roasts work, or read why there is an apple in its mouth, which is a shorter and less useful answer but a more entertaining one.
Tell us about your day and we'll come back to you within 24 hours.
Get a Quote Our Food